 site")
 New features since v1.3:
 >> Page 1: Basics >> Page 2: Portals >> Page 3: Pictures Page 4: Textures
 Sky and Ground Background Texture Selector
Sky and Ground

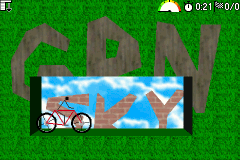 There are 2 kinds of texture objects: Sky and Ground. The level editor displays Sky Textures in magenta and Ground Textures are green.
The screenshot on the right shows how it looks in the game: Ground Textures are only visible over the level terrain, while Sky Textures are placed in the background.
Normally you only work with one kind of objects at a time and the other objects are grayed out - to avoid the clutter. See the animated screenshot on the left (and note the changing object type in the bottom right corner: Grnd/GTex/STex):
- Editing level terrain - it is solid black, while all textures are ghosted
- Editing Ground Textures - level terrain turns light gray, ground textures are dark green
- Editing Sky Textures - sky texture shapes become solid magenta, the other objects appear as ghosts
Background
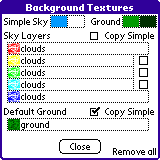
- Use Menu -> Level -> Textures to invoke the Background Textures window
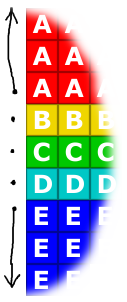
- Sky Layers replace the old "Sky color". Those 5 textures are displayed in the very back of the level (behind Sky Textures). All 5 textures are tiled horizontally, the topmost (A) and the bottommost one (E) is also tiled vertically (if needed) to fill the level area.
- Default Ground is used in where no other Ground Texture is assigned
- Simple Sky and Simple Ground are used in BoD v1 (and in BoD v2 with extended textures disabled). Don't forget to assign a reasonable colors here, even if you are using BoD v2.
- Copy Simple checkboxes reset the textures to the initial state (reflecting the old BoD v1 appearance)
- Transition effects
The 3 middle sky layers can be assigned transition effects. Click one of the 3 "checkboxes" to invoke the effects menu.

"Up" and "Down" apply to the upper or lower half of the texture, respectively. The "other texture" in the text below is the texture above (for the "Up" effect) or below (for the "Down" effect) the texture for which the transition effect is enable.
These examples show the "Up" effects applied to the texture "B". Note that the "A" area is not affected - the effect only influences the upper half of "B".
No transition - Textures are simply placed one above the other.
You may need to assign matching colors in both textures to make the seam invisible.
Repeat - Smooth vertical transition between textures - The other texture is replicated
It looks best with tilable textures, i.e. most built-in textures.
Gradient - Smooth vertical transition between textures - The other's texture edge is stretched vertically to fill the first texture.
Used for textures that should not be repeated vertically, especially the ones showing horizon (mountains, city).
Texture Selector
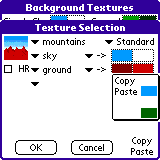 Texture Selector is used to assign the particular texture definition to a Ground/Sky Texture object or a Sky Layer.
- Texture Selection - Use the first popup to select a texture
- Colors - Most textures offer several levels of control on how the colors are assigned:
- All colors -> Default - just use the default palette
- All colors -> custom colors - click the color buttons to assign a color
- Named color range -> custom colors can be assigned to a specific texture areas
- HR (High Resolution) - Makes the texture appear smaller
- Copy & Paste - Can be used to copy the complete texture definition (including colors)
- Color Copy & Paste - Click and hold the color button to popup the color menu - can be used to copy a single color between textures (useful for making perfectly matching sky layers)
