 site")
 New features since v1.3:
 >> Page 1: Basics Page 2: Portals >> Page 3: Pictures >> Page 4: Textures
 Theory Properties Hints Limitations
Portals - advanced quantum phsics devices seamlessly connecting distant locations of the level. Or at least this was the intention :-)
In practice, various limitations can make portals work in unexpected way and appear broken. This manual should help you avoid common mistakes.
Theory
Portal "cuts" part of the object behind its line and transfers it to the other connected portal. The object does not "feel" it is being cut, it can move freely as if nothing happened, except that its parts may be in different locations.

Properties
 Select a portal and click the popup trigger
  to display the portal properties.
They are:
- 1-8 - Portals work in pairs. This numer is a "channel number" - portals having the same number are connected.
- Left and Right - these switched decide if one can enter the portal (and from which side). Obviously, disabling it on both ends does not make sense. Enabling only one side (Left or Right) is sometimes useful, however the portal will be eventually activated even when the player approaches it from the "wrong" side (because it will evetually find itself on the "good" side).
Note#1: "Left" and "Right" retain its literal meaning only when the portal is placed vertically with its "head" (the end with arrows) above the "tail".
Note#2: "Left" and "Right" do not refer to the "Left" and "Right" portals, only to the sides of the single portal. The portal at the other end of the connection has its own Left/Right switches. - Mirror - swaps the portal sides: Left becomes Right and Right becomes Left.
Note#1: The red arrow highlights the direction of the "first" arrow ("first" = the one close to the end of the portal line segment). Any object entering the portal also leaves it at the other end along the same (corresponding) arrow ("left" arrow in the above examples)
Regular+Regular
Regular+Mirror
Note#2: Enabling "mirror" on both connected portals effectively cancels the mirroring
Note#3: Not directly related to mirror but a similar effect: there is no special Up/Down mirror option, just rotate the portal line segment upside down. - Invisible - self-explanatory
- A number below "G" is the portal channel (connection)
- Short arrow means there is only exit and no entry (independend for left and right)
- Mirror swaps the arrows (normally the first arrow points to the right)
- Invisible portal is drawn as dotted line
Hints
The level editor provides 2 hints on portal placement: A short gray line marks the length of the "other end" of the portal. Usually you want to make both ends of equal length as the operation of the portal is more intuitive in such configuration (for you and for the player).
It is also the indicator of the successful connection: portal without a gray line won't work as it does not have its counterpart.
-
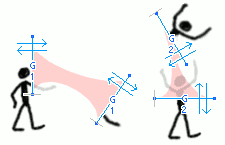
 Light red lines (visible while moving the portal) show the projected ground shape as seen after transforming by the portal geometry. This is another way of looking at the portals - imagine that this is not the player that gets teleported but the grounds transforms accordingly. This tool helps you adjust the portal so there is smooth transition. Simply make the red lines overlap with ground lines.
This works because of the following "portal theorem":
Player experiences a smooth ground transition when teleported <- If and
only if-> The transformed ground merges with the original ground smootly
Limitations
- Only one portal can be active at any given moment. If you place several portals close to each other then the outcome will depend on what portal was activated first. It will continue the operation until the contact is lost and the other portals wont be activated during that time even though the bike crosses their lines. This is untintitive so the best way is to avoid placing portals that way.
- A part of the bike (e.g. a wheel) crossing the portal appears cut in the display, but in fact that part still participates in all collisions until the center of the wheel crosses the portal line. It means that you should pay special attention to the wheel radius-sized zone behind each portal and check if there are any unwanted collisions there.
Consider the following example:

The ideal portal would make the obstacle unreachable - but in fact the bike can still touch the obstacle because it too close to the portal line (the section of the wheel that is hidden behind the portal but collides with the obstacle is marked red).
The most common "bad case" is a portal at a wall, like this one:

The unfortunate wall collision prevents from going through the portal, even though the wall is BEHIND the portal line. Most of such cases can be cured using phantom walls in almost "automatic" fashion (by phantomizing the part of the wall covered by portal), like this:

