 site")
 New features since v1.3:
 >> Page 1: Basics >> Page 2: Portals Page 3: Pictures >> Page 4: Textures
 Managing Pictures Picture Editor Limitations
Managing Pictures
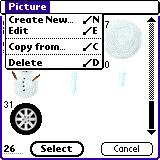 Use menu while selecting a picture to perform additional operations:
- Create New... - creates a new picture and enters the picture editor
- Edit - opens the currently selected picture in the picture editor. Built-in pictures cannot be edited.
- Copy From... - allows you to copy a bitmap from another database (levelpack or any other palm database). Limitations: only the low resolution bitmap will be copied. Picture will be saved in 8-bit color mode regardless of the original bitmap color depth
- Delete
Picture Editor
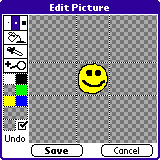
 Brush size selector and
  Flood fill - the usual painting tools
 Color picker - select this tool, then click in the picture to get the color
 Zoom
Zoom
 Color palette - Shows the 6 most recently used colors. Click the palette buttons to change your current painting color.
- Current color - Shows the currently selected color (used by painting tools). Click this button to select another color.
 Transparent color - Click the small checkered rectangle on the left to use the transparent color (painting with transparent color works like erasing). The checkbox on the right indicates if the currently selected color is transparent. Usually there is no need to use this checkbox.
Transparency handling example:
Start with a simple image drawn on the initial transparent background. Click the small "transparent color" button (left of the checkbox). The transparency checkbox activates indicating that you are using the your current painting color is transparent (so the brush would work like an eraser). 
Turn off the checkbox. The background color is no longer transparent and the picture fill the whole rectangle. 
Select some other color (using the color palette or the color picker tool). The disabled checkbox indicates this color (red) is not transparent (obviously). 
Click the checkbox. The red circle vanishes - all red pixels became transparent.
Note: How to restore the initial state from here? Use the color picker to get the background color and once it is selected click the checkbox to make the background transparent again.- Undo - cancel the previous painting operation
- Picture area
- Checkered area is transparent
- Use directional keys to move the picture while in zoom mode
- Drag the dotted boundary lines to enlarge/crop the picture (only works when zoom is disabled)
- Save / Cancel
Limitations
- Only standard density (low resolution), 8-bit (256 colors) bitmaps are supported
- Bitmap size is limited to 128x128 pixels (big pictures are not recommended for BoD anyway. any bit decorations should be designed using textures)
